通知 (Notifications)
- Introduction
- 通知の生成
- 通知の送信
- メール通知
- マークダウンメール通知
- データベース通知
- ブロードキャスト通知
- SMS通知
- Slack 通知
- 通知のローカライズ
- Testing
- 通知イベント
- カスタムチャンネル
導入 (Introduction)
電子メールの送信 のサポートに加えて、Laravel は、電子メール、SMS (旧 Nexmo である Vonage 経由)、Slack など、さまざまな配信チャネルで通知を送信するためのサポートを提供します。さらに、数十の異なるチャネルで通知を送信するために、さまざまな コミュニティが構築した通知チャネル が作成されています。通知はデータベースに保存され、Web インターフェイスに表示される場合もあります。
通常、通知は、アプリケーションで発生した何かをユーザーに通知する短い情報メッセージである必要があります。たとえば、請求アプリケーションを作成している場合、電子メールと SMS チャネルを介してユーザーに「請求書支払い済み」通知を送信できます。
通知の生成 (Generating Notifications)
Laravel では、各通知は単一のクラスで表され、通常は app/Notifications ディレクトリに保存されます。アプリケーションにこのディレクトリが表示されなくても心配する必要はありません。make:notification Artisan コマンドを実行すると作成されます。
php artisan make:notification InvoicePaid
このコマンドは、新しい通知クラスを app/Notifications ディレクトリに配置します。各通知クラスには、via メソッドと、通知をその特定のチャネルに合わせたメッセージに変換する toMail や toDatabase などの可変数のメッセージ構築メソッドが含まれています。
通知の送信 (Sending Notifications)
通知可能な特性の使用
通知は 2 つの方法で送信できます。Notifiable 特性の notify メソッドを使用する方法と、Notification facade を使用する方法です。 Notifiable 特性は、デフォルトでアプリケーションの App\Models\User モデルに含まれています。
<?php

namespace App\Models;

use Illuminate\Foundation\Auth\User as Authenticatable;
use Illuminate\Notifications\Notifiable;

class User extends Authenticatable
{
    use Notifiable;
}
この特性によって提供される notify メソッドは、通知インスタンスを受信することを想定しています。
use App\Notifications\InvoicePaid;

$user->notify(new InvoicePaid($invoice));
どのモデルでも
Notifiableトレイトを使用できることに注意してください。Userモデルに含めるだけに限定されるわけではありません。
通知ファサードの使用
あるいは、Notification facade 経由で通知を送信することもできます。このアプローチは、ユーザーのコレクションなど、複数の通知対象エンティティに通知を送信する必要がある場合に便利です。ファサードを使用して通知を送信するには、すべての通知可能なエンティティと通知インスタンスを send メソッドに渡します。
use Illuminate\Support\Facades\Notification;

Notification::send($users, new InvoicePaid($invoice));
sendNow メソッドを使用して、すぐに通知を送信することもできます。このメソッドは、通知が ShouldQueue インターフェイスを実装している場合でも、通知をすぐに送信します。
Notification::sendNow($developers, new DeploymentCompleted($deployment));
配信チャネルの指定
すべての通知クラスには、通知が配信されるチャネルを決定する via メソッドがあります。通知は、mail、database、broadcast、vonage、および slack チャネルで送信される場合があります。
Telegram や Pusher などの他の配信チャネルを使用したい場合は、コミュニティ主導の Laravel 通知チャネル Web サイト をチェックしてください。
via メソッドは、通知の送信先となるクラスのインスタンスとなる $notifiable インスタンスを受け取ります。 $notifiable を使用して、通知を配信するチャネルを決定できます。
/**
 * Get the notification's delivery channels.
 *
 * @return array<int, string>
 */
public function via(object $notifiable): array
{
    return $notifiable->prefers_sms ? ['vonage'] : ['mail', 'database'];
}
通知のキューイング
通知をキューに入れる前に、キューと ワーカーを始める を設定する必要があります。
特にチャネルが通知を配信するために外部 API 呼び出しを行う必要がある場合、通知の送信には時間がかかることがあります。アプリケーションの応答時間を短縮するには、ShouldQueue インターフェイスと Queueable トレイトをクラスに追加して、通知をキューに入れます。インターフェイスと特性は、make:notification コマンドを使用して生成されたすべての通知に対してすでにインポートされているため、通知クラスにすぐに追加できます。
<?php

namespace App\Notifications;

use Illuminate\Bus\Queueable;
use Illuminate\Contracts\Queue\ShouldQueue;
use Illuminate\Notifications\Notification;

class InvoicePaid extends Notification implements ShouldQueue
{
    use Queueable;

    // ...
}
ShouldQueue インターフェイスが通知に追加されたら、通常どおり通知を送信できます。 Laravel はクラス上の ShouldQueue インターフェイスを検出し、通知の配信を自動的にキューに入れます。
$user->notify(new InvoicePaid($invoice));
通知をキューに入れると、受信者とチャネルの組み合わせごとにキューに入れられたジョブが作成されます。たとえば、通知に 3 人の受信者と 2 つのチャネルがある場合、6 つのジョブがキューにディスパッチされます。
通知の遅延
通知の配信を遅らせたい場合は、通知のインスタンス化に delay メソッドを連鎖させます。
$delay = now()->addMinutes(10);

$user->notify((new InvoicePaid($invoice))->delay($delay));
配列を delay メソッドに渡して、特定のチャネルの遅延量を指定できます。
$user->notify((new InvoicePaid($invoice))->delay([
    'mail' => now()->addMinutes(5),
    'sms' => now()->addMinutes(10),
]));
あるいは、通知クラス自体に withDelay メソッドを定義することもできます。 withDelay メソッドは、チャネル名と遅延値の配列を返す必要があります。
/**
 * Determine the notification's delivery delay.
 *
 * @return array<string, \Illuminate\Support\Carbon>
 */
public function withDelay(object $notifiable): array
{
    return [
        'mail' => now()->addMinutes(5),
        'sms' => now()->addMinutes(10),
    ];
}
通知キュー接続のカスタマイズ
デフォルトでは、キューに入れられた通知は、アプリケーションのデフォルトのキュー接続を使用してキューに入れられます。特定の通知に使用する別の接続を指定したい場合は、通知のコンストラクターから onConnection メソッドを呼び出すことができます。
<?php

namespace App\Notifications;

use Illuminate\Bus\Queueable;
use Illuminate\Contracts\Queue\ShouldQueue;
use Illuminate\Notifications\Notification;

class InvoicePaid extends Notification implements ShouldQueue
{
    use Queueable;

    /**
     * Create a new notification instance.
     */
    public function __construct()
    {
        $this->onConnection('redis');
    }
}
または、通知でサポートされる各通知チャネルに使用する特定のキュー接続を指定したい場合は、通知で viaConnections メソッドを定義できます。このメソッドは、チャネル名とキュー接続名のペアの配列を返す必要があります。
/**
 * Determine which connections should be used for each notification channel.
 *
 * @return array<string, string>
 */
public function viaConnections(): array
{
    return [
        'mail' => 'redis',
        'database' => 'sync',
    ];
}
通知チャネルキューのカスタマイズ
通知でサポートされる各通知チャネルに使用する特定のキューを指定したい場合は、通知で viaQueues メソッドを定義できます。このメソッドは、チャネル名とキュー名のペアの配列を返す必要があります。
/**
 * Determine which queues should be used for each notification channel.
 *
 * @return array<string, string>
 */
public function viaQueues(): array
{
    return [
        'mail' => 'mail-queue',
        'slack' => 'slack-queue',
    ];
}
キューに入れられた通知ミドルウェア
キューに入れられた通知はミドルウェア キューに入れられたジョブと同じように を定義する場合があります。まず、通知クラスで middleware メソッドを定義します。 middleware メソッドは $notifiable 変数と $channel 変数を受け取ります。これにより、返されるミドルウェアを通知の宛先に基づいてカスタマイズできます。
use Illuminate\Queue\Middleware\RateLimited;

/**
 * Get the middleware the notification job should pass through.
 *
 * @return array<int, object>
 */
public function middleware(object $notifiable, string $channel)
{
    return match ($channel) {
        'email' => [new RateLimited('postmark')],
        'slack' => [new RateLimited('slack')],
        default => [],
    };
}
キューに入れられた通知とデータベーストランザクション
キューに入れられた通知がデータベース トランザクション内でディスパッチされると、データベース トランザクションがコミットされる前にキューによって通知が処理される場合があります。この問題が発生すると、データベース トランザクション中にモデルまたはデータベース レコードに対して行った更新がまだデータベースに反映されていない可能性があります。さらに、トランザクション内で作成されたモデルやデータベース レコードはデータベースに存在しない可能性があります。通知がこれらのモデルに依存している場合、キューに入れられた通知を送信するジョブの処理時に予期しないエラーが発生する可能性があります。
キュー接続の after_commit 構成オプションが false に設定されている場合でも、通知の送信時に afterCommit メソッドを呼び出すことにより、開いているすべてのデータベース トランザクションがコミットされた後に特定のキューに入れられた通知を送信する必要があることを示すことができます。
use App\Notifications\InvoicePaid;

$user->notify((new InvoicePaid($invoice))->afterCommit());
あるいは、通知のコンストラクターから afterCommit メソッドを呼び出すこともできます。
<?php

namespace App\Notifications;

use Illuminate\Bus\Queueable;
use Illuminate\Contracts\Queue\ShouldQueue;
use Illuminate\Notifications\Notification;

class InvoicePaid extends Notification implements ShouldQueue
{
    use Queueable;

    /**
     * Create a new notification instance.
     */
    public function __construct()
    {
        $this->afterCommit();
    }
}
これらの問題の回避方法の詳細については、キューに入れられたジョブとデータベース トランザクション に関するドキュメントを参照してください。
キューに入れられた通知を送信するかどうかの決定
キューに入れられた通知は、バックグラウンド処理のためにキューにディスパッチされた後、通常、キューワーカーによって受け入れられ、目的の受信者に送信されます。
ただし、キューに入れられた通知がキューワーカーによって処理された後に送信するかどうかを最終決定したい場合は、通知クラスで shouldSend メソッドを定義できます。このメソッドが false を返した場合、通知は送信されません。
/**
 * Determine if the notification should be sent.
 */
public function shouldSend(object $notifiable, string $channel): bool
{
    return $this->invoice->isPaid();
}
オンデマンド通知
場合によっては、アプリケーションの「ユーザー」として保存されていない人に通知を送信する必要がある場合があります。 Notification ファサードの route メソッドを使用すると、通知を送信する前にアドホック通知ルーティング情報を指定できます。
use Illuminate\Broadcasting\Channel;
use Illuminate\Support\Facades\Notification;
->route('vonage', '5555555555')
->route('slack', '#slack-channel')
->route('broadcast', [new Channel('channel-name')])
->notify(new InvoicePaid($invoice));
オンデマンド通知を mail ルートに送信するときに受信者の名前を指定したい場合は、電子メール アドレスをキーとして、名前を配列の最初の要素の値として含む配列を指定できます。
Notification::route('mail', [
])->notify(new InvoicePaid($invoice));
routes メソッドを使用すると、複数の通知チャネルにアドホック ルーティング情報を一度に提供できます。
Notification::routes([
'vonage' => '5555555555',
])->notify(new InvoicePaid($invoice));
メール通知 (Mail Notifications)
メールメッセージのフォーマット
通知が電子メールとして送信されることをサポートしている場合は、通知クラスで toMail メソッドを定義する必要があります。このメソッドは $notifiable エンティティを受け取り、Illuminate\Notifications\Messages\MailMessage インスタンスを返す必要があります。
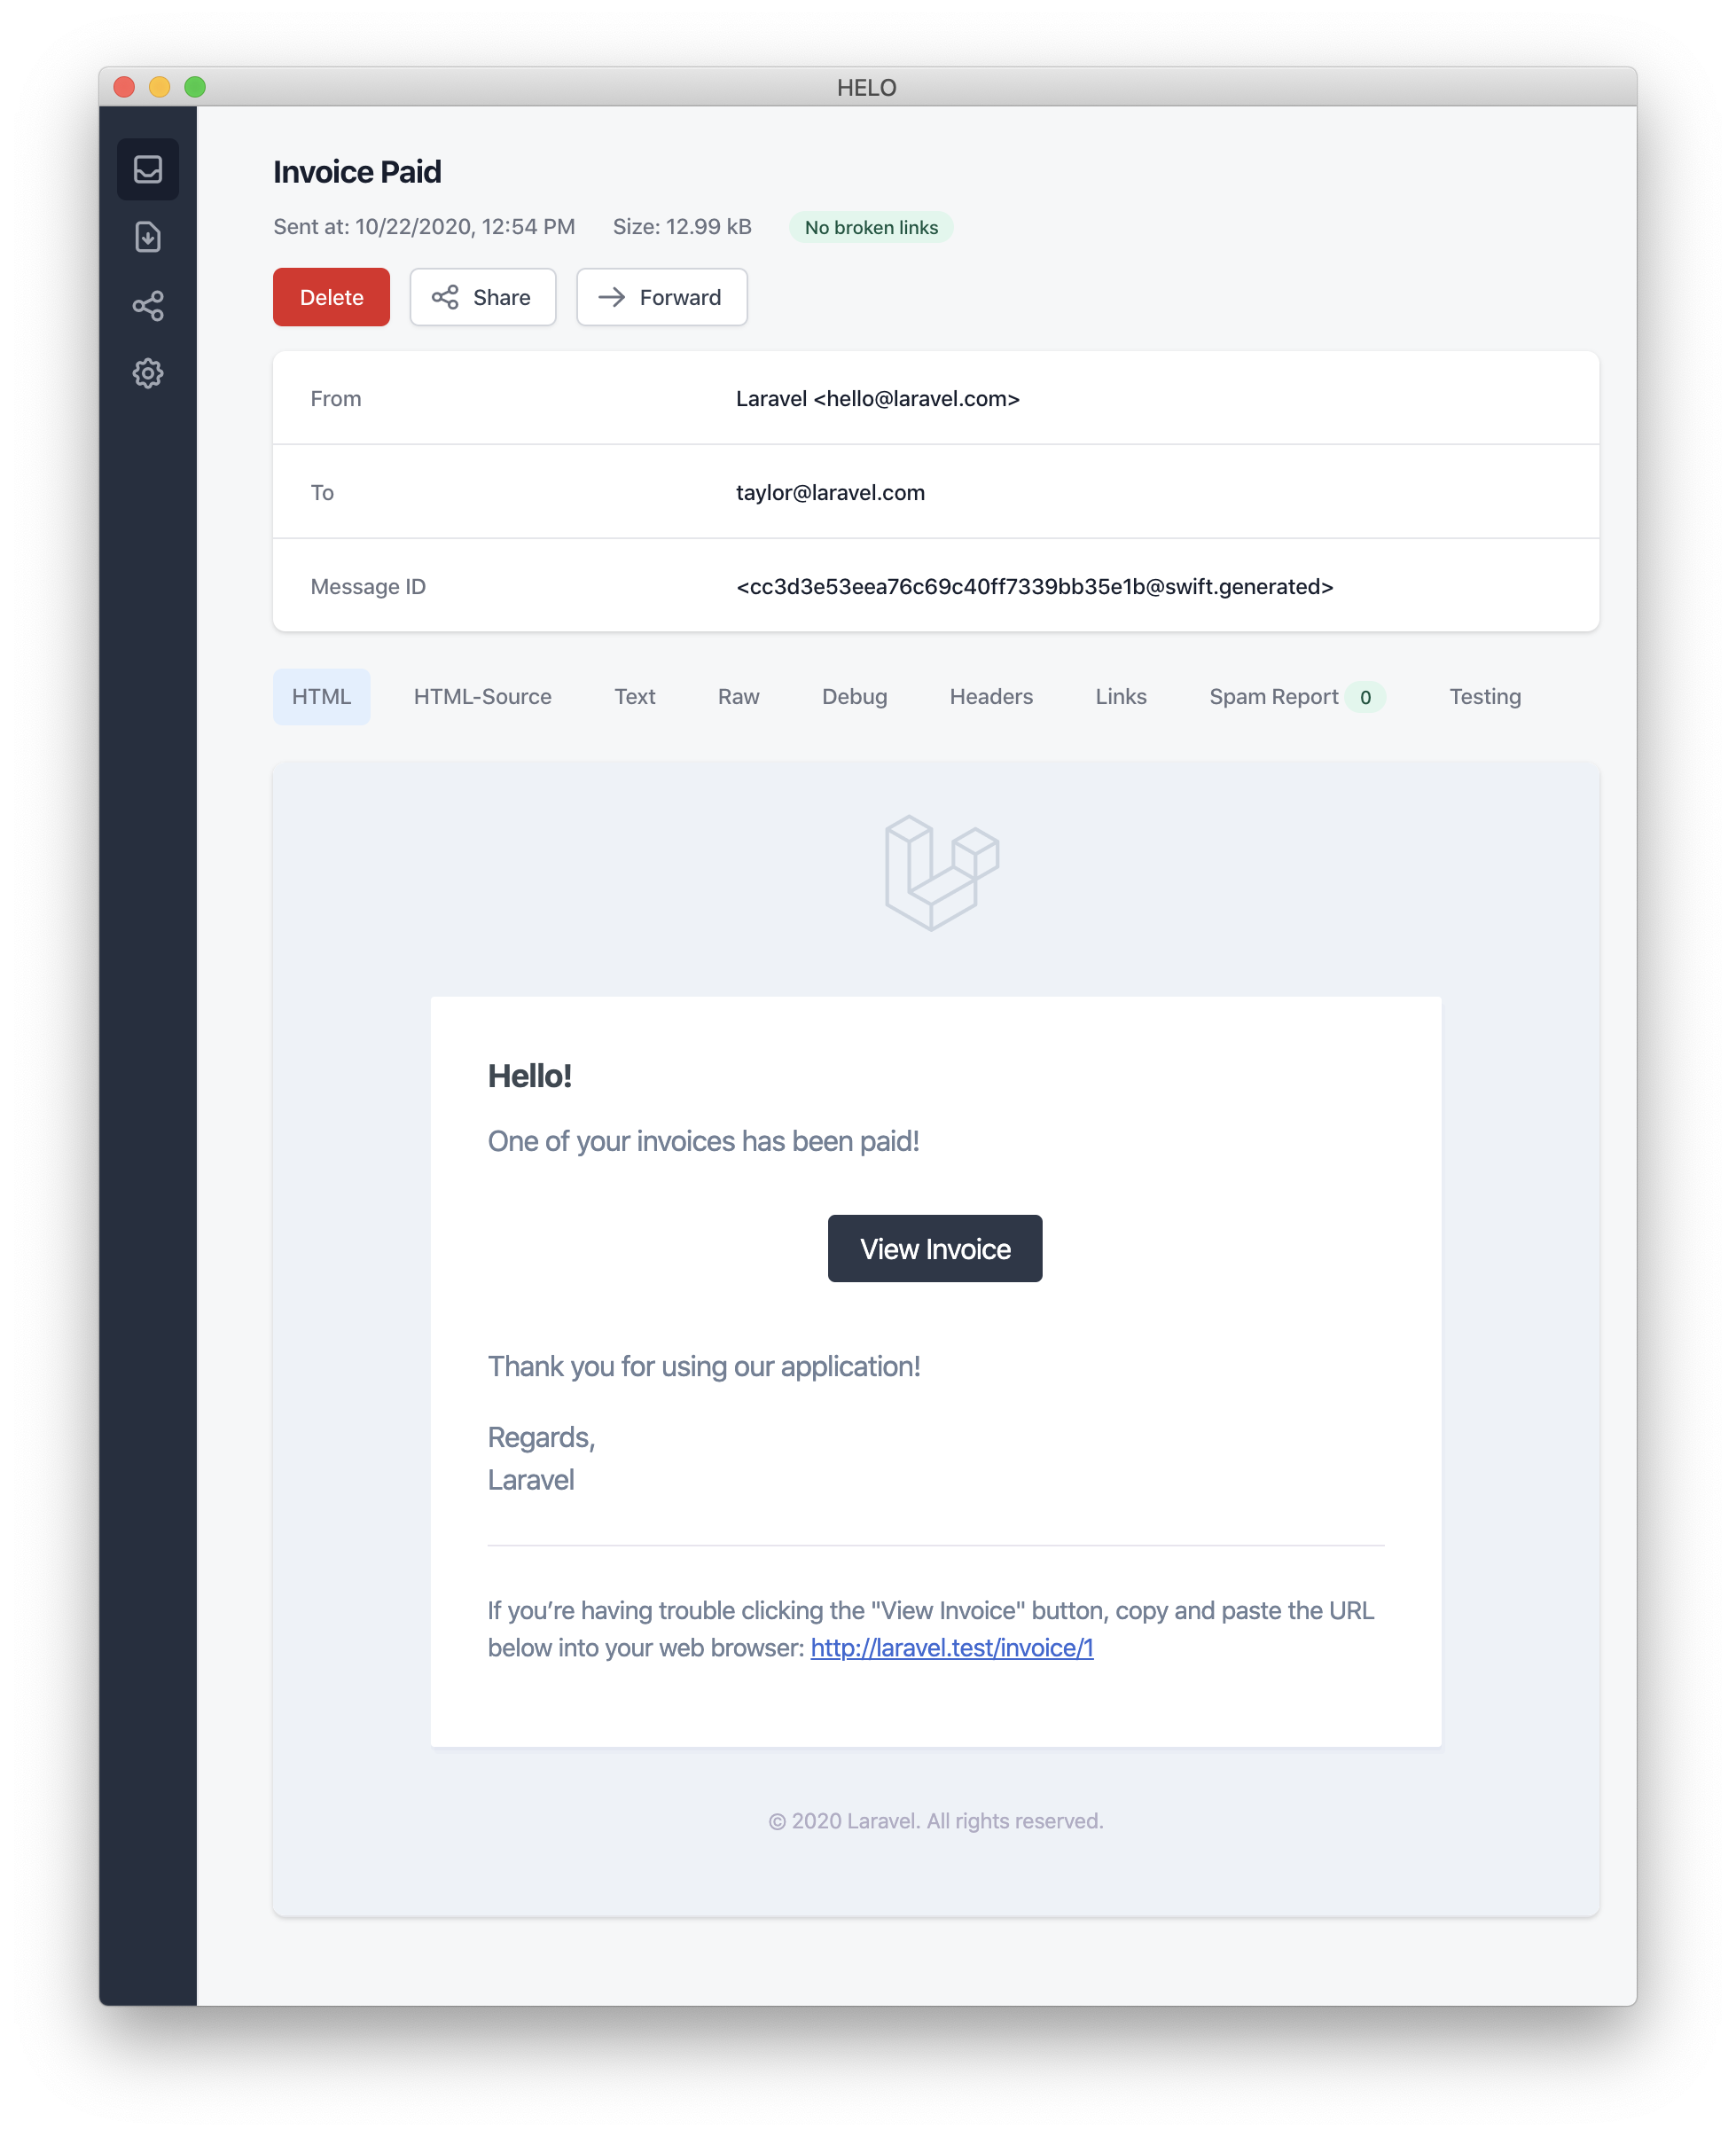
MailMessage クラスには、トランザクション電子メール メッセージの作成に役立ついくつかの簡単なメソッドが含まれています。メールメッセージには、テキスト行と「行動喚起」が含まれる場合があります。 toMail メソッドの例を見てみましょう。
/**
 * Get the mail representation of the notification.
 */
public function toMail(object $notifiable): MailMessage
{
    $url = url('/invoice/'.$this->invoice->id);

    return (new MailMessage)
        ->greeting('Hello!')
        ->line('One of your invoices has been paid!')
        ->lineIf($this->amount > 0, "Amount paid: {$this->amount}")
        ->action('View Invoice', $url)
        ->line('Thank you for using our application!');
}
toMailメソッドで$this->invoice->idを使用していることに注意してください。通知がメッセージを生成するために必要なデータを通知のコンストラクターに渡すことができます。
この例では、挨拶、テキスト行、行動喚起、そして別のテキスト行を登録します。 MailMessage オブジェクトによって提供されるこれらのメソッドにより、小規模なトランザクション電子メールのフォーマットが簡単かつ迅速になります。次に、メール チャネルは、メッセージ コンポーネントを、対応するプレーン テキストを含む美しく応答性の高い HTML 電子メール テンプレートに変換します。 mail チャネルによって生成された電子メールの例を次に示します。
メール通知を送信するときは、
config/app.php構成ファイルでname構成オプションを必ず設定してください。この値は、メール通知メッセージのヘッダーとフッターで使用されます。
エラーメッセージ
一部の通知は、請求書支払いの失敗などのエラーをユーザーに通知します。メッセージの作成時に error メソッドを呼び出すことで、メール メッセージがエラーに関するものであることを示すことができます。メール メッセージで error メソッドを使用すると、CTA ボタンが黒ではなく赤になります。
/**
 * Get the mail representation of the notification.
 */
public function toMail(object $notifiable): MailMessage
{
    return (new MailMessage)
        ->error()
        ->subject('Invoice Payment Failed')
        ->line('...');
}
その他のメール通知の形式オプション
通知クラスでテキストの「行」を定義する代わりに、view メソッドを使用して、通知電子メールのレンダリングに使用するカスタム テンプレートを指定できます。
/**
 * Get the mail representation of the notification.
 */
public function toMail(object $notifiable): MailMessage
{
    return (new MailMessage)->view(
        'mail.invoice.paid', ['invoice' => $this->invoice]
    );
}
view メソッドに与えられる配列の 2 番目の要素としてビュー名を渡すことで、メール メッセージのプレーンテキスト ビューを指定できます。
/**
 * Get the mail representation of the notification.
 */
public function toMail(object $notifiable): MailMessage
{
    return (new MailMessage)->view(
        ['mail.invoice.paid', 'mail.invoice.paid-text'],
        ['invoice' => $this->invoice]
    );
}
または、メッセージにプレーンテキスト ビューのみがある場合は、text メソッドを利用できます。
/**
 * Get the mail representation of the notification.
 */
public function toMail(object $notifiable): MailMessage
{
    return (new MailMessage)->text(
        'mail.invoice.paid-text', ['invoice' => $this->invoice]
    );
}
送信者のカスタマイズ
デフォルトでは、電子メールの送信者/差出人のアドレスは、config/mail.php 構成ファイルで定義されます。ただし、from メソッドを使用して、特定の通知の送信元アドレスを指定できます。
/**
* Get the mail representation of the notification.
*/
public function toMail(object $notifiable): MailMessage
{
return (new MailMessage)
->line('...');
}
受信者のカスタマイズ
mail チャネル経由で通知を送信すると、通知システムは通知対象エンティティの email プロパティを自動的に検索します。通知可能なエンティティで routeNotificationForMail メソッドを定義することにより、通知の配信に使用される電子メール アドレスをカスタマイズできます。
<?php

namespace App\Models;

use Illuminate\Foundation\Auth\User as Authenticatable;
use Illuminate\Notifications\Notifiable;
use Illuminate\Notifications\Notification;

class User extends Authenticatable
{
    use Notifiable;

    /**
     * Route notifications for the mail channel.
     *
     * @return  array<string, string>|string
     */
    public function routeNotificationForMail(Notification $notification): array|string
    {
        // Return email address only...
        return $this->email_address;

        // Return email address and name...
        return [$this->email_address => $this->name];
    }
}
件名のカスタマイズ
デフォルトでは、電子メールの件名は、「Title Case」にフォーマットされた通知のクラス名です。したがって、通知クラスの名前が InvoicePaid の場合、電子メールの件名は Invoice Paid になります。メッセージに別の件名を指定したい場合は、メッセージの作成時に subject メソッドを呼び出すことができます。
/**
 * Get the mail representation of the notification.
 */
public function toMail(object $notifiable): MailMessage
{
    return (new MailMessage)
        ->subject('Notification Subject')
        ->line('...');
}
メーラーのカスタマイズ
デフォルトでは、電子メール通知は、config/mail.php 構成ファイルで定義されたデフォルトのメーラーを使用して送信されます。ただし、メッセージの作成時に mailer メソッドを呼び出すことで、実行時に別のメーラーを指定できます。
/**
 * Get the mail representation of the notification.
 */
public function toMail(object $notifiable): MailMessage
{
    return (new MailMessage)
        ->mailer('postmark')
        ->line('...');
}
テンプレートのカスタマイズ
通知パッケージのリソースを公開することで、メール通知で使用される HTML およびプレーンテキストのテンプレートを変更できます。このコマンドを実行すると、メール通知テンプレートが resources/views/vendor/notifications ディレクトリに配置されます。
php artisan vendor:publish --tag=laravel-notifications
添付ファイル
電子メール通知に添付ファイルを追加するには、メッセージの作成時に attach メソッドを使用します。 attach メソッドは、最初の引数としてファイルへの絶対パスを受け入れます。
/**
 * Get the mail representation of the notification.
 */
public function toMail(object $notifiable): MailMessage
{
    return (new MailMessage)
        ->greeting('Hello!')
        ->attach('/path/to/file');
}
通知メール メッセージによって提供される
attachメソッドは、取り付け可能なオブジェクト も受け入れます。詳細については、包括的な アタッチ可能なオブジェクトのドキュメント を参照してください。
メッセージにファイルを添付するときは、array を attach メソッドの 2 番目の引数として渡すことで、表示名や MIME タイプを指定することもできます。
/**
 * Get the mail representation of the notification.
 */
public function toMail(object $notifiable): MailMessage
{
    return (new MailMessage)
        ->greeting('Hello!')
        ->attach('/path/to/file', [
            'as' => 'name.pdf',
            'mime' => 'application/pdf',
        ]);
}
メール可能オブジェクトにファイルを添付する場合とは異なり、attachFromStorage を使用してストレージ ディスクからファイルを直接添付することはできません。むしろ、ストレージ ディスク上のファイルへの絶対パスを指定して attach メソッドを使用する必要があります。あるいは、toMail メソッドから mailable を返すこともできます。
use App\Mail\InvoicePaid as InvoicePaidMailable;

/**
 * Get the mail representation of the notification.
 */
public function toMail(object $notifiable): Mailable
{
    return (new InvoicePaidMailable($this->invoice))
        ->to($notifiable->email)
        ->attachFromStorage('/path/to/file');
}
必要に応じて、attachMany メソッドを使用して複数のファイルをメッセージに添付できます。
/**
 * Get the mail representation of the notification.
 */
public function toMail(object $notifiable): MailMessage
{
    return (new MailMessage)
        ->greeting('Hello!')
        ->attachMany([
            '/path/to/forge.svg',
            '/path/to/vapor.svg' => [
                'as' => 'Logo.svg',
                'mime' => 'image/svg+xml',
            ],
        ]);
}
生データの添付ファイル
attachData メソッドを使用して、生のバイト文字列を添付ファイルとして添付できます。 attachData メソッドを呼び出すときは、添付ファイルに割り当てるファイル名を指定する必要があります。
/**
 * Get the mail representation of the notification.
 */
public function toMail(object $notifiable): MailMessage
{
    return (new MailMessage)
        ->greeting('Hello!')
        ->attachData($this->pdf, 'name.pdf', [
            'mime' => 'application/pdf',
        ]);
}
タグとメタデータの追加
Mailgun や Postmark などの一部のサードパーティ電子メール プロバイダは、メッセージの「タグ」と「メタデータ」をサポートしています。これらは、アプリケーションによって送信された電子メールをグループ化し、追跡するために使用される場合があります。 tag および metadata メソッドを使用して、電子メール メッセージにタグとメタデータを追加できます。
/**
 * Get the mail representation of the notification.
 */
public function toMail(object $notifiable): MailMessage
{
    return (new MailMessage)
        ->greeting('Comment Upvoted!')
        ->tag('upvote')
        ->metadata('comment_id', $this->comment->id);
}
アプリケーションが Mailgun ドライバを使用している場合、tags および metadata の詳細については、Mailgun のドキュメントを参照してください。同様に、tags および metadata のサポートの詳細については、消印のドキュメントを参照することもできます。
アプリケーションが Amazon SES を使用して E メールを送信している場合は、metadata メソッドを使用してメッセージに SESの「タグ」 を添付する必要があります。
Symfony メッセージのカスタマイズ
MailMessage クラスの withSymfonyMessage メソッドを使用すると、メッセージを送信する前に Symfony Message インスタンスで呼び出されるクロージャを登録できます。これにより、メッセージを配信する前に詳細にカスタマイズする機会が得られます。
use Symfony\Component\Mime\Email;

/**
 * Get the mail representation of the notification.
 */
public function toMail(object $notifiable): MailMessage
{
    return (new MailMessage)
        ->withSymfonyMessage(function (Email $message) {
            $message->getHeaders()->addTextHeader(
                'Custom-Header', 'Header Value'
            );
        });
}
メール可能ファイルの使用
必要に応じて、通知の toMail メソッドから完全な 郵送可能なオブジェクト を返すことができます。 MailMessage の代わりに Mailable を返す場合は、メール可能オブジェクトの to メソッドを使用してメッセージ受信者を指定する必要があります。
use App\Mail\InvoicePaid as InvoicePaidMailable;
use Illuminate\Mail\Mailable;

/**
 * Get the mail representation of the notification.
 */
public function toMail(object $notifiable): Mailable
{
    return (new InvoicePaidMailable($this->invoice))
        ->to($notifiable->email);
}
メール可能アイテムとオンデマンド通知
オンデマンド通知 を送信する場合、toMail メソッドに指定される $notifiable インスタンスは、オンデマンド通知の送信先となる電子メール アドレスを取得するために使用できる routeNotificationFor メソッドを提供する Illuminate\Notifications\AnonymousNotifiable のインスタンスになります。
use App\Mail\InvoicePaid as InvoicePaidMailable;
use Illuminate\Notifications\AnonymousNotifiable;
use Illuminate\Mail\Mailable;

/**
 * Get the mail representation of the notification.
 */
public function toMail(object $notifiable): Mailable
{
    $address = $notifiable instanceof AnonymousNotifiable
        ? $notifiable->routeNotificationFor('mail')
        : $notifiable->email;

    return (new InvoicePaidMailable($this->invoice))
        ->to($address);
}
メール通知のプレビュー
メール通知テンプレートを設計する場合、一般的な Blade テンプレートと同様に、レンダリングされたメール メッセージをブラウザですばやくプレビューできると便利です。このため、Laravel では、メール通知によって生成されたメール メッセージをルート クロージャーまたはコントローラから直接返すことができます。 MailMessage が返されると、ブラウザーにレンダリングされて表示されるため、実際の電子メール アドレスに送信しなくても、そのデザインをすばやくプレビューできます。
use App\Models\Invoice;
use App\Notifications\InvoicePaid;

Route::get('/notification', function () {
    $invoice = Invoice::find(1);

    return (new InvoicePaid($invoice))
        ->toMail($invoice->user);
});
マークダウンメール通知 (Markdown Mail Notifications)
マークダウン メール通知を使用すると、メール通知の事前に構築されたテンプレートを利用できると同時に、カスタマイズされた長いメッセージをより自由に作成できるようになります。メッセージは Markdown で記述されているため、Laravel はメッセージ用の美しく応答性の高い HTML テンプレートをレンダリングできると同時に、対応するプレーンテキストも自動的に生成します。
メッセージの生成
対応するマークダウン テンプレートで通知を生成するには、make:notification Artisan コマンドの --markdown オプションを使用できます。
php artisan make:notification InvoicePaid --markdown=mail.invoice.paid
他のすべてのメール通知と同様、Markdown テンプレートを使用する通知は、通知クラスで toMail メソッドを定義する必要があります。ただし、line メソッドと action メソッドを使用して通知を作成する代わりに、markdown メソッドを使用して、使用する必要がある Markdown テンプレートの名前を指定します。テンプレートで使用できるようにしたいデータの配列は、メソッドの 2 番目の引数として渡すことができます。
/**
 * Get the mail representation of the notification.
 */
public function toMail(object $notifiable): MailMessage
{
    $url = url('/invoice/'.$this->invoice->id);

    return (new MailMessage)
        ->subject('Invoice Paid')
        ->markdown('mail.invoice.paid', ['url' => $url]);
}
メッセージを書く
Markdown メール通知では、Blade コンポーネントと Markdown 構文の組み合わせを使用するため、Laravel の事前に作成された通知コンポーネントを活用しながら、通知を簡単に構築できます。
<x-mail::message>
# Invoice Paid

Your invoice has been paid!

<x-mail::button :url="$url">
View Invoice
</x-mail::button>

Thanks,<br>
{{ config('app.name') }}
</x-mail::message>
ボタンコンポーネント
ボタン コンポーネントは、中央にボタン リンクをレンダリングします。このコンポーネントは、url とオプションの color の 2 つの引数を受け入れます。サポートされている色は、primary、green、および red です。ボタン コンポーネントは必要なだけ通知に追加できます。
<x-mail::button :url="$url" color="green">
View Invoice
</x-mail::button>
パネルコンポーネント
パネル コンポーネントは、通知の残りの部分とはわずかに異なる背景色を持つパネルに指定されたテキスト ブロックをレンダリングします。これにより、特定のテキスト ブロックに注意を向けることができます。
<x-mail::panel>
This is the panel content.
</x-mail::panel>
テーブルコンポーネント
table コンポーネントを使用すると、Markdown テーブルを HTML テーブルに変換できます。コンポーネントは、Markdown テーブルをコンテンツとして受け入れます。テーブル列の配置は、デフォルトの Markdown テーブル配置構文を使用してサポートされます。
<x-mail::table>
| Laravel       | Table         | Example       |
| ------------- | :-----------: | ------------: |
| Col 2 is      | Centered      | $10           |
| Col 3 is      | Right-Aligned | $20           |
</x-mail::table>
コンポーネントのカスタマイズ
すべての Markdown 通知コンポーネントを独自のアプリケーションにエクスポートしてカスタマイズできます。コンポーネントをエクスポートするには、vendor:publish Artisan コマンドを使用して、laravel-mail アセット タグを公開します。
php artisan vendor:publish --tag=laravel-mail
このコマンドは、Markdown メール コンポーネントを resources/views/vendor/mail ディレクトリに公開します。 mail ディレクトリには、html ディレクトリと text ディレクトリが含まれ、それぞれに使用可能なすべてのコンポーネントのそれぞれの表現が含まれます。これらのコンポーネントは自由にカスタマイズできます。
CSSのカスタマイズ
コンポーネントをエクスポートすると、resources/views/vendor/mail/html/themes ディレクトリに default.css ファイルが含まれます。このファイルの CSS をカスタマイズすると、スタイルは Markdown 通知の HTML 表現内に自動的にインラインで組み込まれます。
Laravel の Markdown コンポーネント用にまったく新しいテーマを構築したい場合は、CSS ファイルを html/themes ディレクトリ内に配置できます。 CSS ファイルに名前を付けて保存した後、mail 構成ファイルの theme オプションを新しいテーマの名前と一致するように更新します。
個々の通知のテーマをカスタマイズするには、通知のメール メッセージを作成するときに theme メソッドを呼び出すことができます。 theme メソッドは、通知の送信時に使用するテーマの名前を受け入れます。
/**
 * Get the mail representation of the notification.
 */
public function toMail(object $notifiable): MailMessage
{
    return (new MailMessage)
        ->theme('invoice')
        ->subject('Invoice Paid')
        ->markdown('mail.invoice.paid', ['url' => $url]);
}
データベース通知 (Database Notifications)
前提条件
database 通知チャネルは、通知情報をデータベース テーブルに保存します。このテーブルには、通知タイプや通知を説明する JSON データ構造などの情報が含まれます。
テーブルをクエリして、アプリケーションのユーザー インターフェイスに通知を表示できます。ただし、その前に、通知を保持するデータベース テーブルを作成する必要があります。 make:notifications-table コマンドを使用して、適切なテーブル スキーマを持つ migration を生成できます。
php artisan make:notifications-table

php artisan migrate
通知対象モデルが UUID または ULID の主キー を使用している場合は、通知テーブルの移行で
morphsメソッドをuuidMorphsまたはulidMorphsに置き換える必要があります。
データベース通知のフォーマット
通知がデータベース テーブルへの保存をサポートしている場合は、通知クラスで toDatabase メソッドまたは toArray メソッドを定義する必要があります。このメソッドは $notifiable エンティティを受け取り、プレーンな PHP 配列を返す必要があります。返された配列は JSON としてエンコードされ、notifications テーブルの data 列に保存されます。 toArray メソッドの例を見てみましょう。
/**
 * Get the array representation of the notification.
 *
 * @return array<string, mixed>
 */
public function toArray(object $notifiable): array
{
    return [
        'invoice_id' => $this->invoice->id,
        'amount' => $this->invoice->amount,
    ];
}
通知がアプリケーションのデータベースに保存されると、type 列はデフォルトで通知のクラス名に設定され、read_at 列は null になります。ただし、通知クラスで databaseType メソッドと initialDatabaseReadAtValue メソッドを定義することで、この動作をカスタマイズできます。
use Illuminate\Support\Carbon;

/**
 * Get the notification's database type.
 */
public function databaseType(object $notifiable): string
{
    return 'invoice-paid';
}

/**
 * Get the initial value for the "read_at" column.
 */
public function initialDatabaseReadAtValue(): ?Carbon
{
    return null;
}
toDatabase vs. toArray
toArray メソッドは、JavaScript を利用したフロントエンドにブロードキャストするデータを決定するために、broadcast チャネルでも使用されます。 database チャネルと broadcast チャネルに 2 つの異なる配列表現を使用したい場合は、toArray メソッドの代わりに toDatabase メソッドを定義する必要があります。
通知へのアクセス
通知がデータベースに保存されたら、通知対象エンティティから通知にアクセスする便利な方法が必要になります。 Laravel のデフォルトの App\Models\User モデルに含まれる Illuminate\Notifications\Notifiable トレイトには、エンティティの通知を返す notifications Eloquent リレーション が含まれています。通知を取得するには、他の Eloquent 関係と同様に、このメソッドにアクセスできます。デフォルトでは、通知は created_at タイムスタンプによって並べ替えられ、最新の通知がコレクションの先頭に表示されます。
$user = App\Models\User::find(1);

foreach ($user->notifications as $notification) {
    echo $notification->type;
}
「未読」通知のみを取得したい場合は、unreadNotifications 関係を使用できます。繰り返しますが、これらの通知は created_at タイムスタンプによって並べ替えられ、最新の通知がコレクションの先頭に表示されます。
$user = App\Models\User::find(1);

foreach ($user->unreadNotifications as $notification) {
    echo $notification->type;
}
JavaScript クライアントから通知にアクセスするには、現在のユーザーなどの通知可能なエンティティに通知を返すアプリケーションの通知コントローラを定義する必要があります。その後、JavaScript クライアントからそのコントローラの URL に対して HTTP リクエストを行うことができます。
通知を既読としてマークする
通常、ユーザーが通知を表示したときに、通知を「既読」としてマークする必要があります。 Illuminate\Notifications\Notifiable トレイトは、通知のデータベース レコードの read_at 列を更新する markAsRead メソッドを提供します。
$user = App\Models\User::find(1);

foreach ($user->unreadNotifications as $notification) {
    $notification->markAsRead();
}
ただし、各通知をループする代わりに、通知のコレクションに対して markAsRead メソッドを直接使用することもできます。
$user->unreadNotifications->markAsRead();
一括更新クエリを使用して、データベースから通知を取得せずに、すべての通知を既読としてマークすることもできます。
$user = App\Models\User::find(1);

$user->unreadNotifications()->update(['read_at' => now()]);
通知を delete してテーブルから完全に削除できます。
$user->notifications()->delete();
ブロードキャスト通知 (Broadcast Notifications)
前提条件
通知をブロードキャストする前に、Laravel の イベント放送 サービスを設定し、よく理解しておく必要があります。イベントブロードキャストは、JavaScript を利用したフロントエンドからサーバーサイドの Laravel イベントに反応する方法を提供します。
ブロードキャスト通知のフォーマット
broadcast チャネルは、Laravel の イベント放送 サービスを使用して通知をブロードキャストし、JavaScript を利用したフロントエンドがリアルタイムで通知をキャッチできるようにします。通知がブロードキャストをサポートしている場合は、通知クラスで toBroadcast メソッドを定義できます。このメソッドは $notifiable エンティティを受け取り、BroadcastMessage インスタンスを返す必要があります。 toBroadcast メソッドが存在しない場合は、ブロードキャストするデータを収集するために toArray メソッドが使用されます。返されたデータは JSON としてエンコードされ、JavaScript を利用したフロントエンドにブロードキャストされます。 toBroadcast メソッドの例を見てみましょう。
use Illuminate\Notifications\Messages\BroadcastMessage;

/**
 * Get the broadcastable representation of the notification.
 */
public function toBroadcast(object $notifiable): BroadcastMessage
{
    return new BroadcastMessage([
        'invoice_id' => $this->invoice->id,
        'amount' => $this->invoice->amount,
    ]);
}
ブロードキャストキューの設定
すべてのブロードキャスト通知はブロードキャストのためにキューに入れられます。ブロードキャスト操作をキューに入れるために使用されるキュー接続またはキュー名を構成したい場合は、BroadcastMessage の onConnection および onQueue メソッドを使用できます。
return (new BroadcastMessage($data))
    ->onConnection('sqs')
    ->onQueue('broadcasts');
通知タイプのカスタマイズ
指定したデータに加えて、すべてのブロードキャスト通知には、通知の完全なクラス名を含む type フィールドもあります。通知 type をカスタマイズしたい場合は、通知クラスで broadcastType メソッドを定義できます。
/**
 * Get the type of the notification being broadcast.
 */
public function broadcastType(): string
{
    return 'broadcast.message';
}
通知を聞く
通知は、{notifiable}.{id} 規則を使用してフォーマットされたプライベート チャネルでブロードキャストされます。したがって、1 の ID を持つ App\Models\User インスタンスに通知を送信する場合、通知は App.Models.User.1 プライベート チャネルでブロードキャストされます。 Laravel Echo を使用する場合、notification メソッドを使用してチャネル上の通知を簡単にリッスンできます。
Echo.private('App.Models.User.' + userId)
    .notification((notification) => {
        console.log(notification.type);
    });
通知チャネルのカスタマイズ
エンティティのブロードキャスト通知がどのチャネルでブロードキャストされるかをカスタマイズしたい場合は、通知可能なエンティティで receivesBroadcastNotificationsOn メソッドを定義できます。
<?php

namespace App\Models;

use Illuminate\Broadcasting\PrivateChannel;
use Illuminate\Foundation\Auth\User as Authenticatable;
use Illuminate\Notifications\Notifiable;

class User extends Authenticatable
{
    use Notifiable;

    /**
     * The channels the user receives notification broadcasts on.
     */
    public function receivesBroadcastNotificationsOn(): string
    {
        return 'users.'.$this->id;
    }
}
SMS通知 (SMS Notifications)
前提条件
Laravel での SMS 通知の送信は、Vonage (旧名 Nexmo) を利用しています。 Vonage 経由で通知を送信する前に、laravel/vonage-notification-channel および guzzlehttp/guzzle パッケージをインストールする必要があります。
composer require laravel/vonage-notification-channel guzzlehttp/guzzle
パッケージには 設定ファイル が含まれています。ただし、この構成ファイルを独自のアプリケーションにエクスポートする必要はありません。 VONAGE_KEY および VONAGE_SECRET 環境変数を使用するだけで、Vonage の公開キーと秘密キーを定義できます。
キーを定義した後、デフォルトで SMS メッセージの送信元となる電話番号を定義する VONAGE_SMS_FROM 環境変数を設定する必要があります。この電話番号は、Vonage コントロール パネル内で生成できます。
VONAGE_SMS_FROM=15556666666
SMS 通知のフォーマット
通知が SMS としての送信をサポートしている場合は、通知クラスで toVonage メソッドを定義する必要があります。このメソッドは $notifiable エンティティを受け取り、Illuminate\Notifications\Messages\VonageMessage インスタンスを返す必要があります。
use Illuminate\Notifications\Messages\VonageMessage;

/**
 * Get the Vonage / SMS representation of the notification.
 */
public function toVonage(object $notifiable): VonageMessage
{
    return (new VonageMessage)
        ->content('Your SMS message content');
}
Unicode コンテンツ
SMS メッセージに Unicode 文字が含まれる場合は、VonageMessage インスタンスを構築するときに unicode メソッドを呼び出す必要があります。
use Illuminate\Notifications\Messages\VonageMessage;

/**
 * Get the Vonage / SMS representation of the notification.
 */
public function toVonage(object $notifiable): VonageMessage
{
    return (new VonageMessage)
        ->content('Your unicode message')
        ->unicode();
}
「差出人」番号のカスタマイズ
VONAGE_SMS_FROM 環境変数で指定された電話番号とは異なる電話番号から通知を送信したい場合は、VonageMessage インスタンスで from メソッドを呼び出すことができます。
use Illuminate\Notifications\Messages\VonageMessage;

/**
 * Get the Vonage / SMS representation of the notification.
 */
public function toVonage(object $notifiable): VonageMessage
{
    return (new VonageMessage)
        ->content('Your SMS message content')
        ->from('15554443333');
}
クライアント参照の追加
ユーザー、チーム、またはクライアントごとのコストを追跡したい場合は、通知に「クライアント参照」を追加できます。 Vonage では、このクライアント リファレンスを使用してレポートを生成できるため、特定の顧客の SMS の使用状況をよりよく理解できます。クライアント参照には、最大 40 文字の任意の文字列を指定できます。
use Illuminate\Notifications\Messages\VonageMessage;

/**
 * Get the Vonage / SMS representation of the notification.
 */
public function toVonage(object $notifiable): VonageMessage
{
    return (new VonageMessage)
        ->clientReference((string) $notifiable->id)
        ->content('Your SMS message content');
}
SMS 通知のルーティング
Vonage 通知を適切な電話番号にルーティングするには、通知対象エンティティで routeNotificationForVonage メソッドを定義します。
<?php

namespace App\Models;

use Illuminate\Foundation\Auth\User as Authenticatable;
use Illuminate\Notifications\Notifiable;
use Illuminate\Notifications\Notification;

class User extends Authenticatable
{
    use Notifiable;

    /**
     * Route notifications for the Vonage channel.
     */
    public function routeNotificationForVonage(Notification $notification): string
    {
        return $this->phone_number;
    }
}
Slack 通知 (Slack Notifications)
前提条件
Slack 通知を送信する前に、Composer 経由で Slack 通知チャネルをインストールする必要があります。
composer require laravel/slack-notification-channel
さらに、Slack ワークスペース用に スラックアプリ を作成する必要があります。
アプリが作成されているのと同じ Slack ワークスペースにのみ通知を送信する必要がある場合は、アプリに chat:write、chat:write.public、および chat:write.customize スコープがあることを確認する必要があります。 Slack アプリとしてメッセージを送信したい場合は、アプリにも chat:write:bot スコープがあることを確認する必要があります。これらのスコープは、Slack 内の「OAuth と権限」アプリ管理タブから追加できます。
次に、アプリの「ボット ユーザー OAuth トークン」をコピーし、アプリケーションの services.php 構成ファイルの slack 構成配列内に配置します。このトークンは、Slack 内の [OAuth & Permissions] タブにあります。
'slack' => [
    'notifications' => [
        'bot_user_oauth_token' => env('SLACK_BOT_USER_OAUTH_TOKEN'),
        'channel' => env('SLACK_BOT_USER_DEFAULT_CHANNEL'),
    ],
],
アプリの配布
アプリケーションが、アプリケーションのユーザーが所有する外部 Slack ワークスペースに通知を送信する場合は、Slack 経由でアプリケーションを「配布」する必要があります。アプリの配布は、Slack 内のアプリの「配布の管理」タブから管理できます。アプリが配布されたら、アプリケーションのユーザーに代わって Socialite から Slack Botトークンを取得する を使用できます。
Slack 通知の書式設定
通知が Slack メッセージとしての送信をサポートしている場合は、通知クラスで toSlack メソッドを定義する必要があります。このメソッドは $notifiable エンティティを受け取り、Illuminate\Notifications\Slack\SlackMessage インスタンスを返す必要があります。 Slack のブロック キット API を使用してリッチ通知を構築できます。次の例は、Slack の Block Kit ビルダ でプレビューできます。
use Illuminate\Notifications\Slack\BlockKit\Blocks\ContextBlock;
use Illuminate\Notifications\Slack\BlockKit\Blocks\SectionBlock;
use Illuminate\Notifications\Slack\BlockKit\Composites\ConfirmObject;
use Illuminate\Notifications\Slack\SlackMessage;
/**
* Get the Slack representation of the notification.
*/
public function toSlack(object $notifiable): SlackMessage
{
return (new SlackMessage)
->text('One of your invoices has been paid!')
->headerBlock('Invoice Paid')
->contextBlock(function (ContextBlock $block) {
$block->text('Customer #1234');
})
->sectionBlock(function (SectionBlock $block) {
$block->text('An invoice has been paid.');
$block->field("*Invoice No:*\n1000")->markdown();
})
->dividerBlock()
->sectionBlock(function (SectionBlock $block) {
$block->text('Congratulations!');
});
}
Slack の Block Kit Builder テンプレートの使用
Block Kit メッセージを構築するために流暢なメッセージ ビルダ メソッドを使用する代わりに、Slack の Block Kit Builder によって生成された生の JSON ペイロードを usingBlockKitTemplate メソッドに提供することもできます。
use Illuminate\Notifications\Slack\SlackMessage;
use Illuminate\Support\Str;

/**
 * Get the Slack representation of the notification.
 */
public function toSlack(object $notifiable): SlackMessage
{
    $template = <<<JSON
        {
          "blocks": [
            {
              "type": "header",
              "text": {
                "type": "plain_text",
                "text": "Team Announcement"
              }
            },
            {
              "type": "section",
              "text": {
                "type": "plain_text",
                "text": "We are hiring!"
              }
            }
          ]
        }
    JSON;

    return (new SlackMessage)
        ->usingBlockKitTemplate($template);
}
Slack のインタラクティブ性
Slack の Block Kit 通知システムは、ユーザーインタラクションを処理する に強力な機能を提供します。これらの機能を利用するには、Slack アプリで「インタラクティブ性」を有効にし、アプリケーションによって提供される URL を指すように「リクエスト URL」を構成する必要があります。これらの設定は、Slack 内の「インタラクティブ性とショートカット」アプリ管理タブから管理できます。
actionsBlock メソッドを利用する次の例では、Slack は、ボタンをクリックした Slack ユーザー、クリックされたボタンの ID などを含むペイロードを含む POST リクエストを「リクエスト URL」に送信します。その後、アプリケーションはペイロードに基づいて実行するアクションを決定できます。 リクエストを確認する は Slack によって作成されたものであることも確認してください。
use Illuminate\Notifications\Slack\BlockKit\Blocks\ActionsBlock;
use Illuminate\Notifications\Slack\BlockKit\Blocks\ContextBlock;
use Illuminate\Notifications\Slack\BlockKit\Blocks\SectionBlock;
use Illuminate\Notifications\Slack\SlackMessage;

/**
 * Get the Slack representation of the notification.
 */
public function toSlack(object $notifiable): SlackMessage
{
    return (new SlackMessage)
        ->text('One of your invoices has been paid!')
        ->headerBlock('Invoice Paid')
        ->contextBlock(function (ContextBlock $block) {
            $block->text('Customer #1234');
        })
        ->sectionBlock(function (SectionBlock $block) {
            $block->text('An invoice has been paid.');
        })
        ->actionsBlock(function (ActionsBlock $block) {
             // ID defaults to "button_acknowledge_invoice"...
            $block->button('Acknowledge Invoice')->primary();

            // Manually configure the ID...
            $block->button('Deny')->danger()->id('deny_invoice');
        });
}
確認モーダル
アクションを実行する前にユーザーに確認を要求したい場合は、ボタンを定義するときに confirm メソッドを呼び出すことができます。 confirm メソッドは、メッセージと、ConfirmObject インスタンスを受け取るクロージャを受け入れます。
use Illuminate\Notifications\Slack\BlockKit\Blocks\ActionsBlock;
use Illuminate\Notifications\Slack\BlockKit\Blocks\ContextBlock;
use Illuminate\Notifications\Slack\BlockKit\Blocks\SectionBlock;
use Illuminate\Notifications\Slack\BlockKit\Composites\ConfirmObject;
use Illuminate\Notifications\Slack\SlackMessage;

/**
 * Get the Slack representation of the notification.
 */
public function toSlack(object $notifiable): SlackMessage
{
    return (new SlackMessage)
        ->text('One of your invoices has been paid!')
        ->headerBlock('Invoice Paid')
        ->contextBlock(function (ContextBlock $block) {
            $block->text('Customer #1234');
        })
        ->sectionBlock(function (SectionBlock $block) {
            $block->text('An invoice has been paid.');
        })
        ->actionsBlock(function (ActionsBlock $block) {
            $block->button('Acknowledge Invoice')
                ->primary()
                ->confirm(
                    'Acknowledge the payment and send a thank you email?',
                    function (ConfirmObject $dialog) {
                        $dialog->confirm('Yes');
                        $dialog->deny('No');
                    }
                );
        });
}
スラックブロックの検査
構築しているブロックをすぐに検査したい場合は、SlackMessage インスタンスで dd メソッドを呼び出すことができます。 dd メソッドは、Slack の ブロックキットビルダ への URL を生成してダンプします。これにより、ブラウザーにペイロードと通知のプレビューが表示されます。 true を dd メソッドに渡して、生のペイロードをダンプできます。
return (new SlackMessage)
        ->text('One of your invoices has been paid!')
        ->headerBlock('Invoice Paid')
        ->dd();
Slack 通知のルーティング
Slack 通知を適切な Slack チームとチャネルに送信するには、通知可能なモデルで routeNotificationForSlack メソッドを定義します。このメソッドは、次の 3 つの値のいずれかを返します。
null- 通知自体で構成されたチャネルへのルーティングを延期します。SlackMessageを構築するときにtoメソッドを使用して、通知内のチャネルを構成できます。- 通知の送信先となる Slack チャネルを指定する文字列。
#support-channel。 SlackRouteインスタンス。OAuth トークンとチャネル名を指定できます。SlackRoute::make($this->slack_channel, $this->slack_token)。このメソッドは、外部ワークスペースに通知を送信するために使用する必要があります。
たとえば、routeNotificationForSlack メソッドから #support-channel を返すと、アプリケーションの services.php 構成ファイルにあるボット ユーザー OAuth トークンに関連付けられたワークスペースの #support-channel チャネルに通知が送信されます。
<?php

namespace App\Models;

use Illuminate\Foundation\Auth\User as Authenticatable;
use Illuminate\Notifications\Notifiable;
use Illuminate\Notifications\Notification;

class User extends Authenticatable
{
    use Notifiable;

    /**
     * Route notifications for the Slack channel.
     */
    public function routeNotificationForSlack(Notification $notification): mixed
    {
        return '#support-channel';
    }
}
外部 Slack ワークスペースへの通知
外部 Slack ワークスペースに通知を送信する前に、Slack アプリが distributed である必要があります。
もちろん、アプリケーションのユーザーが所有する Slack ワークスペースに通知を送信したい場合もよくあります。これを行うには、まずユーザーの Slack OAuth トークンを取得する必要があります。ありがたいことに、Laravel Socialite には、Slack と ボットトークンを取得する を使用してアプリケーションのユーザーを簡単に認証できるようにする Slack ドライバが含まれています。
ボット トークンを取得してアプリケーションのデータベース内に保存したら、SlackRoute::make メソッドを利用してユーザーのワークスペースに通知をルーティングできます。さらに、アプリケーションでは、どのチャネル通知を送信するかをユーザーに指定する機会を提供する必要がある可能性があります。
<?php

namespace App\Models;

use Illuminate\Foundation\Auth\User as Authenticatable;
use Illuminate\Notifications\Notifiable;
use Illuminate\Notifications\Notification;
use Illuminate\Notifications\Slack\SlackRoute;

class User extends Authenticatable
{
    use Notifiable;

    /**
     * Route notifications for the Slack channel.
     */
    public function routeNotificationForSlack(Notification $notification): mixed
    {
        return SlackRoute::make($this->slack_channel, $this->slack_token);
    }
}
通知のローカライズ (Localizing Notifications)
Laravel では、HTTP リクエストの現在のロケール以外のロケールで通知を送信することができ、通知がキューに入れられている場合でもこのロケールを記憶します。
これを実現するために、Illuminate\Notifications\Notification クラスは、希望の言語を設定するための locale メソッドを提供します。アプリケーションは、通知の評価中にこのロケールに変更され、評価が完了すると前のロケールに戻ります。
$user->notify((new InvoicePaid($invoice))->locale('es'));
複数の通知可能なエントリのローカライズは、Notification ファサードを介して実現することもできます。
Notification::locale('es')->send(
    $users, new InvoicePaid($invoice)
);
ユーザーの優先ロケール
場合によっては、アプリケーションが各ユーザーの優先ロケールを保存することがあります。通知可能モデルに HasLocalePreference コントラクトを実装することで、通知を送信するときにこの保存されたロケールを使用するように Laravel に指示できます。
use Illuminate\Contracts\Translation\HasLocalePreference;

class User extends Model implements HasLocalePreference
{
    /**
     * Get the user's preferred locale.
     */
    public function preferredLocale(): string
    {
        return $this->locale;
    }
}
インターフェースを実装すると、Laravel は通知とメール可能ファイルをモデルに送信するときに優先ロケールを自動的に使用します。したがって、このインターフェイスを使用する場合は、locale メソッドを呼び出す必要はありません。
$user->notify(new InvoicePaid($invoice));
テスト (Testing)
Notification ファサードの fake メソッドを使用して、通知が送信されないようにすることができます。通常、通知の送信は、実際にテストしているコードとは無関係です。おそらく、Laravel が特定の通知を送信するように指示されたと主張するだけで十分です。
Notification ファサードの fake メソッドを呼び出した後、通知がユーザーに送信されるように指示されたことをアサートし、通知が受信したデータを検査することもできます。
<?php

use App\Notifications\OrderShipped;
use Illuminate\Support\Facades\Notification;

test('orders can be shipped', function () {
    Notification::fake();

    // Perform order shipping...

    // Assert that no notifications were sent...
    Notification::assertNothingSent();

    // Assert a notification was sent to the given users...
    Notification::assertSentTo(
        [$user], OrderShipped::class
    );

    // Assert a notification was not sent...
    Notification::assertNotSentTo(
        [$user], AnotherNotification::class
    );

    // Assert that a given number of notifications were sent...
    Notification::assertCount(3);
});
<?php

namespace Tests\Feature;

use App\Notifications\OrderShipped;
use Illuminate\Support\Facades\Notification;
use Tests\TestCase;

class ExampleTest extends TestCase
{
    public function test_orders_can_be_shipped(): void
    {
        Notification::fake();

        // Perform order shipping...

        // Assert that no notifications were sent...
        Notification::assertNothingSent();

        // Assert a notification was sent to the given users...
        Notification::assertSentTo(
            [$user], OrderShipped::class
        );

        // Assert a notification was not sent...
        Notification::assertNotSentTo(
            [$user], AnotherNotification::class
        );

        // Assert that a given number of notifications were sent...
        Notification::assertCount(3);
    }
}
特定の「真実テスト」に合格する通知が送信されたことをアサートするために、assertSentTo メソッドまたは assertNotSentTo メソッドにクロージャを渡すことができます。指定された真実テストに合格する少なくとも 1 つの通知が送信された場合、アサーションは成功します。
Notification::assertSentTo(
    $user,
    function (OrderShipped $notification, array $channels) use ($order) {
        return $notification->order->id === $order->id;
    }
);
オンデマンド通知
テストしているコードが オンデマンド通知 を送信する場合、オンデマンド通知が assertSentOnDemand メソッド経由で送信されたことをテストできます。
Notification::assertSentOnDemand(OrderShipped::class);
assertSentOnDemand メソッドの 2 番目の引数としてクロージャーを渡すことで、オンデマンド通知が正しい「ルート」アドレスに送信されたかどうかを判断できます。
Notification::assertSentOnDemand(
    OrderShipped::class,
    function (OrderShipped $notification, array $channels, object $notifiable) use ($user) {
        return $notifiable->routes['mail'] === $user->email;
    }
);
通知イベント (Notification Events)
通知送信イベント
通知の送信中に、通知システムによって Illuminate\Notifications\Events\NotificationSending イベントが送出されます。これには、「通知可能な」エンティティと通知インスタンス自体が含まれます。アプリケーション内でこのイベント用に イベントリスナ を作成できます。
use Illuminate\Notifications\Events\NotificationSending;

class CheckNotificationStatus
{
    /**
     * Handle the given event.
     */
    public function handle(NotificationSending $event): void
    {
        // ...
    }
}
NotificationSending イベントのイベント リスナが handle メソッドから false を返した場合、通知は送信されません。
/**
 * Handle the given event.
 */
public function handle(NotificationSending $event): bool
{
    return false;
}
イベント リスナ内で、イベントの notifiable、notification、および channel プロパティにアクセスして、通知受信者または通知自体の詳細を確認できます。
/**
 * Handle the given event.
 */
public function handle(NotificationSending $event): void
{
    // $event->channel
    // $event->notifiable
    // $event->notification
}
通知送信イベント
通知が送信されると、通知システムによって Illuminate\Notifications\Events\NotificationSent event がディスパッチされます。これには、「通知可能な」エンティティと通知インスタンス自体が含まれます。アプリケーション内でこのイベント用に event を作成できます。
use Illuminate\Notifications\Events\NotificationSent;

class LogNotification
{
    /**
     * Handle the given event.
     */
    public function handle(NotificationSent $event): void
    {
        // ...
    }
}
イベント リスナ内で、イベントの notifiable、notification、channel、および response プロパティにアクセスして、通知受信者または通知自体の詳細を確認できます。
/**
 * Handle the given event.
 */
public function handle(NotificationSent $event): void
{
    // $event->channel
    // $event->notifiable
    // $event->notification
    // $event->response
}
カスタムチャンネル (Custom Channels)
Laravel にはいくつかの通知チャネルが付属していますが、他のチャネル経由で通知を配信する独自のドライバを作成することもできます。 Laravel を使えば簡単になります。まず、send メソッドを含むクラスを定義します。このメソッドは、$notifiable と $notification の 2 つの引数を受け取る必要があります。
send メソッド内で、通知のメソッドを呼び出して、チャネルによって理解されるメッセージ オブジェクトを取得し、通知を $notifiable インスタンスに送信することができます。
<?php

namespace App\Notifications;

use Illuminate\Notifications\Notification;

class VoiceChannel
{
    /**
     * Send the given notification.
     */
    public function send(object $notifiable, Notification $notification): void
    {
        $message = $notification->toVoice($notifiable);

        // Send notification to the $notifiable instance...
    }
}
通知チャネル クラスを定義したら、任意の通知の via メソッドからクラス名を返すことができます。この例では、通知の toVoice メソッドは、音声メッセージを表すために選択したオブジェクトを返すことができます。たとえば、次のメッセージを表す独自の VoiceMessage クラスを定義できます。
<?php

namespace App\Notifications;

use App\Notifications\Messages\VoiceMessage;
use App\Notifications\VoiceChannel;
use Illuminate\Bus\Queueable;
use Illuminate\Contracts\Queue\ShouldQueue;
use Illuminate\Notifications\Notification;

class InvoicePaid extends Notification
{
    use Queueable;

    /**
     * Get the notification channels.
     */
    public function via(object $notifiable): string
    {
        return VoiceChannel::class;
    }

    /**
     * Get the voice representation of the notification.
     */
    public function toVoice(object $notifiable): VoiceMessage
    {
        // ...
    }
}